The importance of having print-ready designs for businesses and how Brikl can help.
Are you tired of spending hours tweaking your designs to make them print-ready? Say goodbye to the hassle and frustration with Brikl, the ultimate solution for turning your concepts into reality. In this blog post, we’ll explore how Brikl streamlines the design process and ensures that every detail is perfect before printing. Get ready to revolutionize your creating experience – let’s dive in!
💡 A print-ready design is a final digital file prepared for decorators or printers that doesn’t need further adjustments or modifications. These designs are essential because they ensure the final custom product accurately represents the intended design and meets your brand standards.
Having print-ready designs not only saves time but also reduces costs associated with reprints or graphic revisions. At Brikl, we understand the significance of having print-ready designs for businesses of all sizes. That’s why our platform offers various tools and features to help users create high-quality print files your chosen decorators will click their heels over!
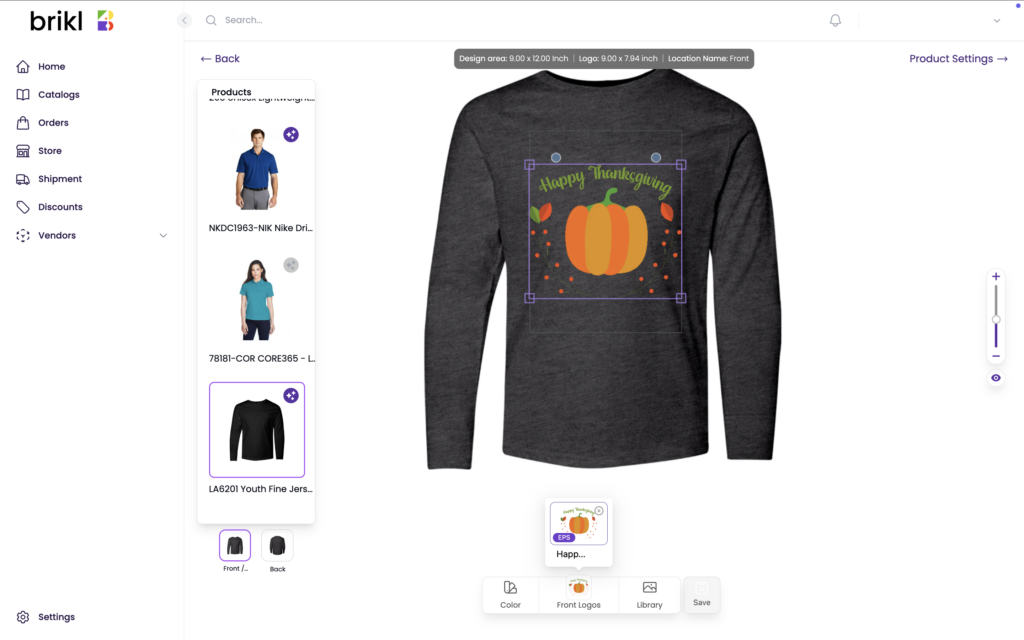
Our system ensures that all art files meet industry standards, while our user-friendly design editor allows you to adjust your artwork precisely according to preset product placeholders. From resizing images to adjusting placement so it doesn’t go over seams and joints, our editor provides all the tools to achieve perfect alignment and spacing on every item.
Brikl’s expert team consists of experienced store and product builders who thoroughly review product placeholders. This process ensures that every order is error-free before being sent to production.
Understanding design formats: Explaining EPS and DST files
When it comes to printing designs, understanding the different file formats that are used is crucial. Two commonly used formats are EPS and DST files.
EPS (Encapsulated PostScript) files are vector graphics file format that can be opened by various design software such as Adobe Illustrator and CorelDRAW. They use mathematical equations to define elements in the design, which allows them to be scaled without losing quality. This makes them ideal for printing as the designs can be resized without any loss of resolution or sharpness.

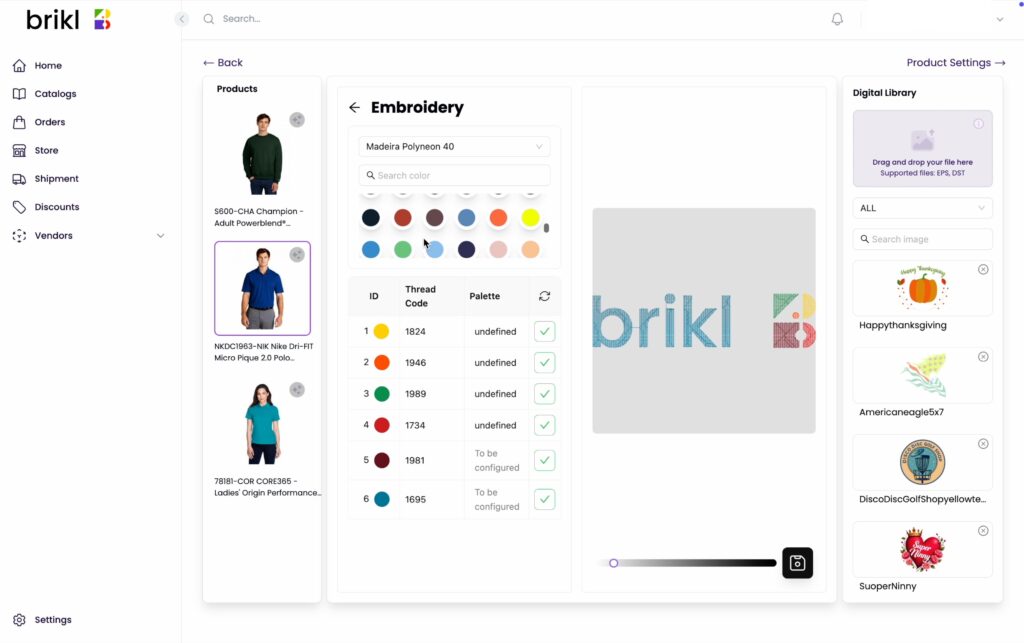
DST (Drawing Stitch) files, on the other hand, are a type of embroidery format used primarily by industrial embroidery machines. These machines read DST files to create embroidered designs on fabrics such as t-shirts, hats, and bags. The DST format includes color information and stitch commands that tell the machine where to place each thread in the design.

Most printers prefer not to receive EPS files. For instance, FAST accepts only JPG or PNG files. So, why do we ask users to upload EPS files? In the backend, we convert EPS files to the required format before sending them to the printer’s API. This ensures the printer always gets the correct file format without any hassle. By requesting EPS files from users, we gain the flexibility to convert them to any format needed by different printers.
Another important consideration is print quality. Both EPS and DST files are designed specifically for high-quality printing purposes. As mentioned earlier, EPS files maintain their quality even when enlarged while DST files provide precise instructions for embroidery machines to follow, resulting in accurately reproduced designs on fabric.
Additionally, these file formats also allow for easier editing and customization of designs before sending them off for printing or embroidery production.
💡 Using compatible file formats streamlines the entire process from concept to creation. Designers can send print-ready files directly to printers or embroiderers without worrying about compatibility issues or having their work rejected due to incorrect file formats.
The Conversion Process: Step-by-Step
The conversion process is crucial in ensuring that your designs are print-ready. That’s why we have developed a comprehensive and efficient conversion process that guarantees your EPS and DST files will be translated into the correct format.
But what if you only have a PNG or JPG file on hand? Don’t worry; we’ve got tools to help you convert them seamlessly. Check out these AI-powered converters:
- PNG to EPS: CloudConvert and Modify offer user-friendly interfaces for converting PNG files to EPS format, ensuring compatibility with decorator software.
However, it’s important to note that when converting a PNG file to EPS, the white background will often be included, which isn’t ideal for uploading to our dashboard.

In contrast, converting SVG or AI files (which do not have a background initially) to EPS works seamlessly, as these formats can be uploaded to the dashboard without the white background. Therefore, it’s better to recommend users convert SVG or AI files to EPS using CloudConvert for optimal results when uploading art files to our embellishment tool.
- PNG to AI: Need to convert your PNG to Adobe Illustrator (AI) format? Convertio has you covered, making it easy to edit and customize your designs before converting them to EPS.

- JPG to DST: If embroidery is your game, Sharkfoto provides a convenient tool for converting JPG files to DST format, ready for stitching on your favorite embroidery machine.
However, be aware that converting from PNG to DST on Sharkfoto requires upgrading to a subscription plan.
We recommend converting AI or SVG files to DST using FileStar. The quality is generally excellent, and there’s no background included, making it a better choice for clean embroidery file preparation.

- Background Removal: Sometimes, you need to remove the background from your images to achieve a clean, professional look. Remove.bg is your go-to solution for effortlessly removing backgrounds from images, saving you time and hassle.
However, while Remove.bg performs well, the output files often have a lower resolution unless you upgrade to a subscription plan. For higher-quality background removal, we recommend using Photoshop, Canva, or the built-in image preview tool on MacBook, which offer more control and better resolution for uploads.

Step 1: File Submission
The first step in our conversion process is submitting your EPS or DST file to our platform. You can easily upload your files through our user-friendly interface. Our system will automatically generate a preview of your design, giving you an initial look at how it will appear on the finished product.
Step 2: Quality Check
Before proceeding with the conversion, our system will thoroughly check your submitted file for errors, sizing issues, or missing elements that may affect the final outcome of your design.
Step 3: Retouching (if necessary)
If we identify any minor issues during the quality check, the system will make retouches on your design using advanced software tools. This ensures that every detail is pixel-perfect and ready for printing.
Step 4: Conversion
Once we have ensured that your design meets all quality standards, the system automates conversion into the correct format for decorators. We use cutting-edge technology that seamlessly converts EPS and DST files into industry-standard formats.
Benefits of Using Brikl: Highlighting the benefits
If you haven’t already noticed, Brikl effortlessly turns your designs into print-ready files! With its user-friendly interface and powerful features, Brikl offers a range of benefits for designers, entrepreneurs, and anyone looking to bring their ideas to life.
For small businesses looking to improve their design skills, we’ve put together some hacks on creating EPS and DST files from scratch, even if you only have a PNG available.
- Start with High-Quality Images: The quality of your design files matters when creating custom products. Begin with high-resolution images to ensure crisp, clear prints or stitches.
- Simplify Complex Designs: Keep your designs clean and straightforward for optimal results. Complex details may not translate well to embroidery or print, so simplify where necessary.

- Use Design Software: Use user-friendly design software like Adobe Illustrator or CorelDRAW to easily create vector-based EPS files. These programs offer powerful tools for manipulating shapes, text, and colors to bring your vision to life.
- Consult with Professionals: Don’t hesitate to contact graphic designers for advice and assistance. They can offer valuable insights into file preparation and optimization for custom products.
In conclusion, one of the main advantages of using Brikl is its ability to customize designs with just a few clicks. Whether designing apparel, hard goods, or any other product, Brikl’s advanced tools allow you to easily resize, rotate, duplicate, or change colors and textures on your designs without compromising their quality. This feature eliminates the need for manual adjustments and saves time while ensuring precise results.
Preparing designs for printing can be daunting, given the various file requirements and specifications of different printers. However, with Brikl’s preview tool, you can rest assured that your designs will always meet industry standards for production. From seam mapping to color mode conversions and image compression, Brikl ensures your files are ready to print without hassle.
With its comprehensive features and user-friendly interface designed specifically for designers, entrepreneurs, and businesses – Brikl ensures a smooth transition from concept to creation and helps you stand out from the competition.


