Feature
Design Tool & Product Setting Table
Design first, configure second. Set up decoration locations and logos in the built-in Design Tool, then manage pricing, variants, and progress in the spreadsheet-style Product Setting Table. No external design software needed.
Why this matters
Decorated apparel programs can have hundreds of products, each with multiple colors, decoration methods, logo placements, and pricing rules. Managing that in spreadsheets and design tools is slow and error-prone. Brikl's built-in Design Tool and Product Setting Table put everything in one place — design your decoration setup visually, then configure and track every product without switching tools.
Multi-location
Decoration placement
Built-in
Embroidery thread profiler
Per-variant
Logo & pricing control
A–Z index
Instant product navigation
Step 1
The built-in Design Tool
Set up decoration locations, upload and assign logos, preview placements on the product, and configure embroidery thread profiles — all inside Brikl.
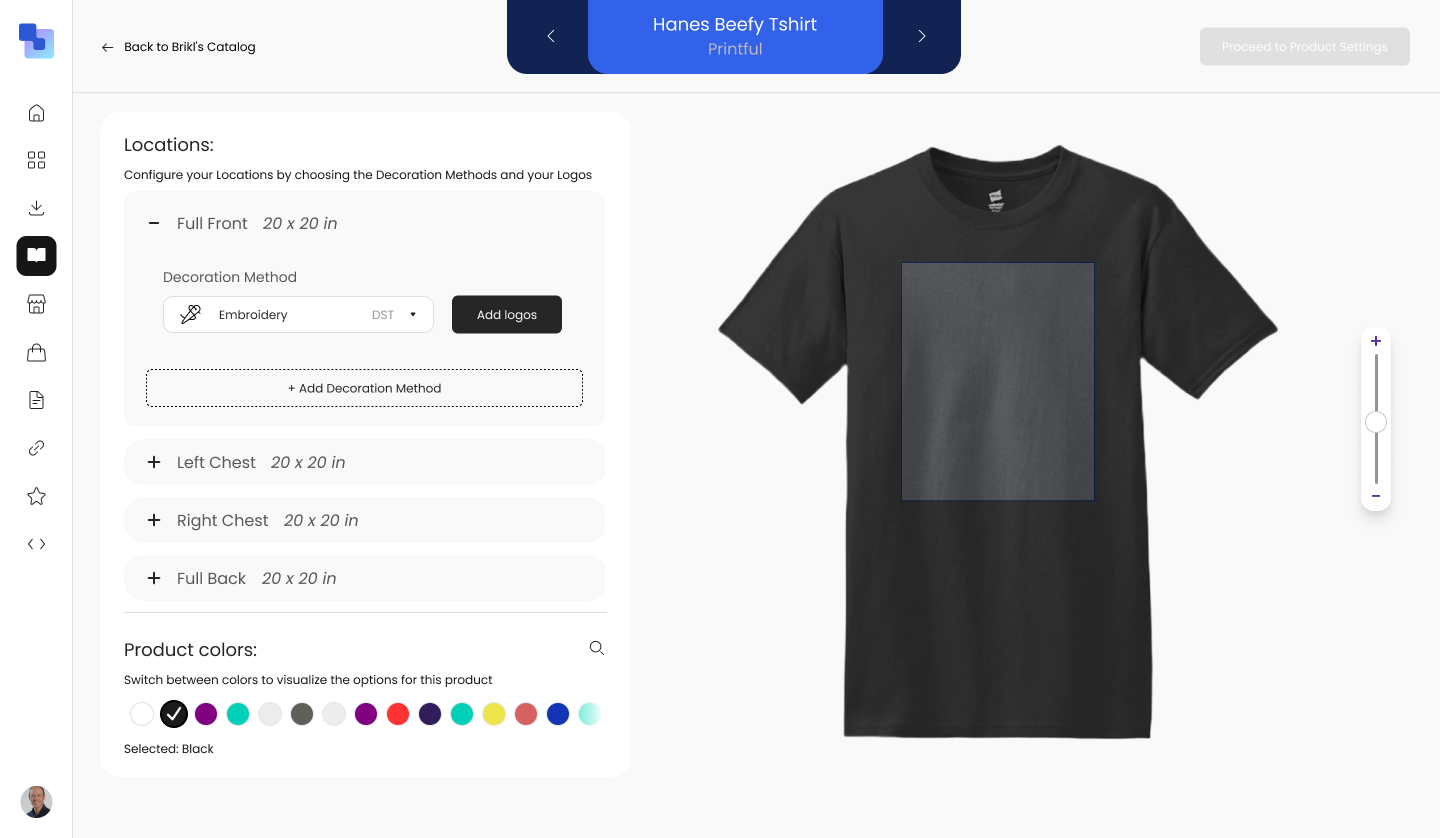
Configure decoration locations
Set up every decoration location on a product — Full Front, Left Chest, Right Chest, Full Back — each with its own dimensions and decoration method. The live preview shows exactly where each decoration zone sits on the product. Add as many locations as the product supports.
- ✓Multiple decoration locations per product
- ✓Set dimensions for each zone (e.g., 25 x 25 in)
- ✓Assign decoration method per location (DTG, Embroidery, Sublimation)
- ✓Live product preview with highlighted decoration zones
- ✓Switch between product colors to visualize on each variant
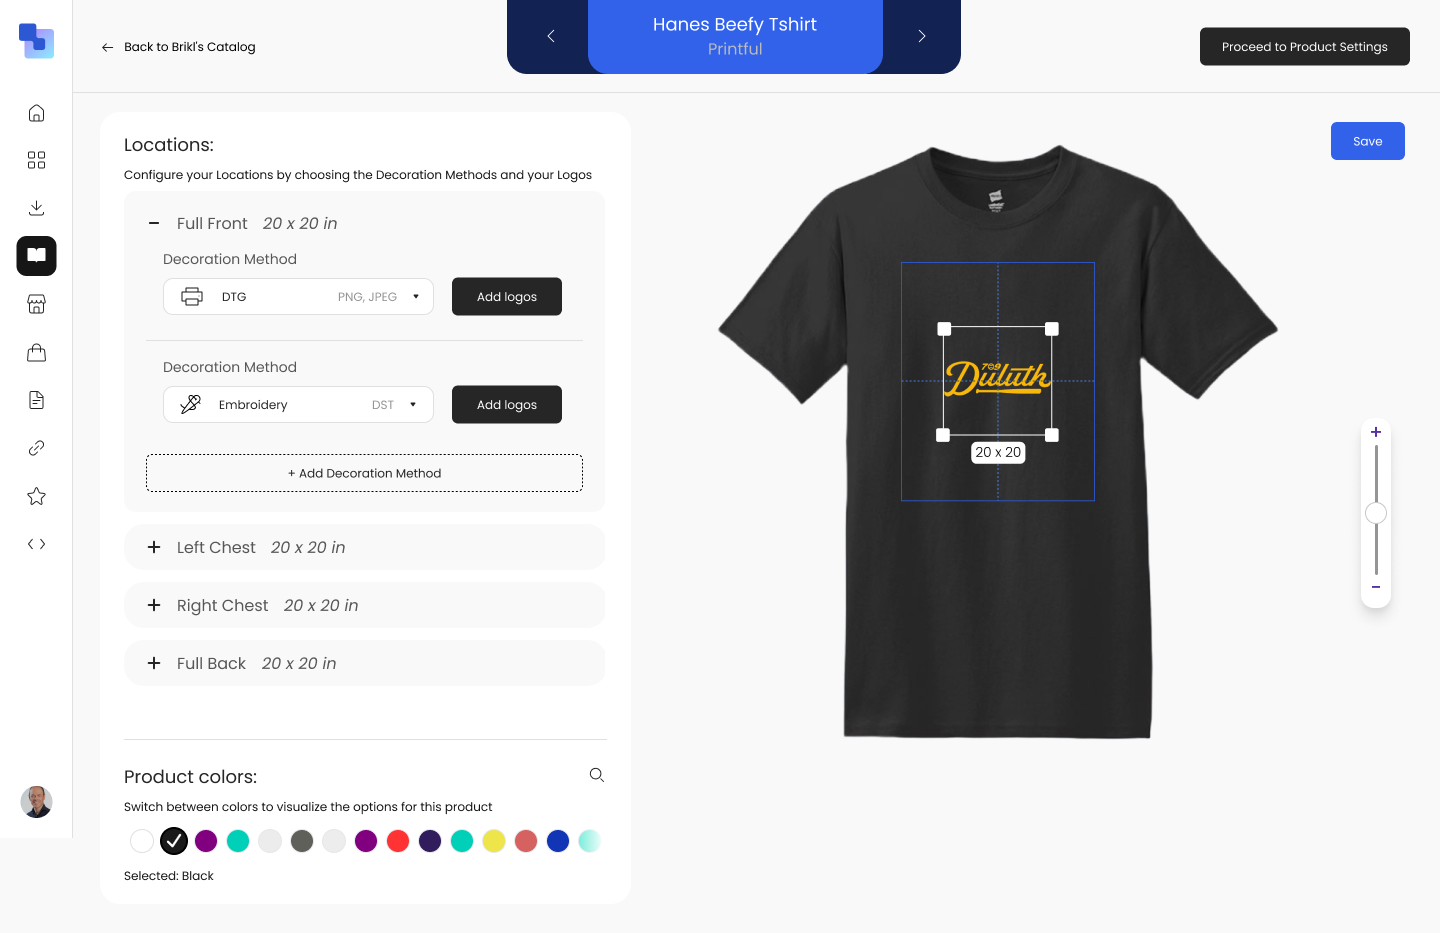
Multiple decoration methods on one product
Combine DTG, embroidery, and other decoration methods on a single product. Each location can use a different method — DTG on the front, embroidery on the chest. The preview updates in real time as you assign logos and methods to each zone.
- ✓Mix decoration methods across locations
- ✓Assign different logos per location
- ✓Real-time product preview with logo placement
- ✓Add decoration methods with one click
Your logo library, always accessible
Upload logos once and reuse them across every product in every catalog. The library stores all file formats — PNG, SVG, DST, JPEG — so each decoration method gets the right file type. Search, filter, and assign logos to any location in seconds.
- ✓Centralized logo library across all catalogs
- ✓Supports PNG, SVG, DST, JPEG, and more
- ✓Search by filename to find logos instantly
- ✓Upload from your computer or browse your library
Embroidery thread profiling
The built-in embroidery profiler maps your logo colors to actual thread palettes — Madeira Classic Rayon, and others. Configure profiles per fulfillment partner (Printful Enterprise, Fast, Fulfill Engine) so each partner gets the exact thread colors they need. See the color mapping in real time alongside the logo preview.
- ✓Map logo colors to thread palettes (e.g., Madeira Classic Rayon 40)
- ✓Separate embroidery profiles per fulfillment partner
- ✓Base color → changed color mapping with hex values
- ✓Live logo preview shows the embroidery result

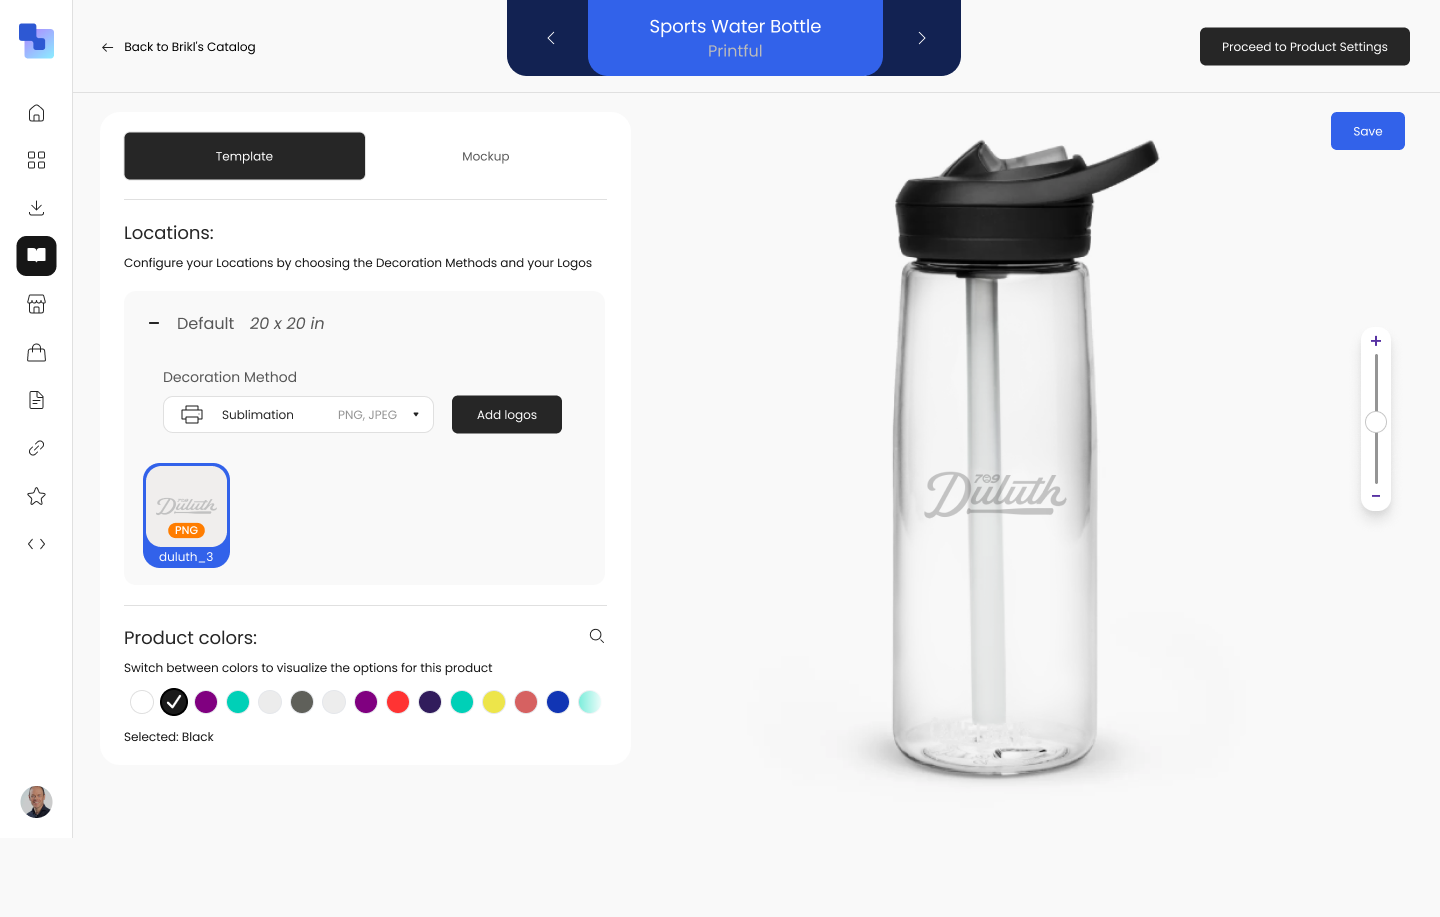
Templates for non-apparel products
Not everything is a t-shirt. The Design Tool supports templates for drinkware, tech accessories, stationery, and more. Switch between template and mockup views to see the decoration layout or a realistic product preview. Each product model has its own location set.
- ✓Template and Mockup views for non-apparel products
- ✓Supports drinkware, tech accessories, stationery, and more
- ✓Model selector for products with multiple variants (e.g., AirPods Pro vs. AirPods)
- ✓Sublimation, UV printing, and other specialty methods
Step 2
The Product Setting Table
Once your designs are set, manage everything else from a single spreadsheet-style table — variants, logos per variant, pricing, and progress tracking.
Every product at a glance
Every product in your catalog appears in a single table. Each row shows the product thumbnail, fulfillment partner, decoration method badges, color swatches, pricing, tax settings, and configuration status — organized by category with an A–Z index for instant navigation.
- ✓Products grouped by category (Apparel, Dressware, Hat, etc.)
- ✓Decoration method badges (DTG, DTF, Embroidery) per product
- ✓Color swatches and pricing visible on every row
- ✓Green checkmarks for completed products, pending for in-progress
- ✓A–Z alphabetical index for fast navigation
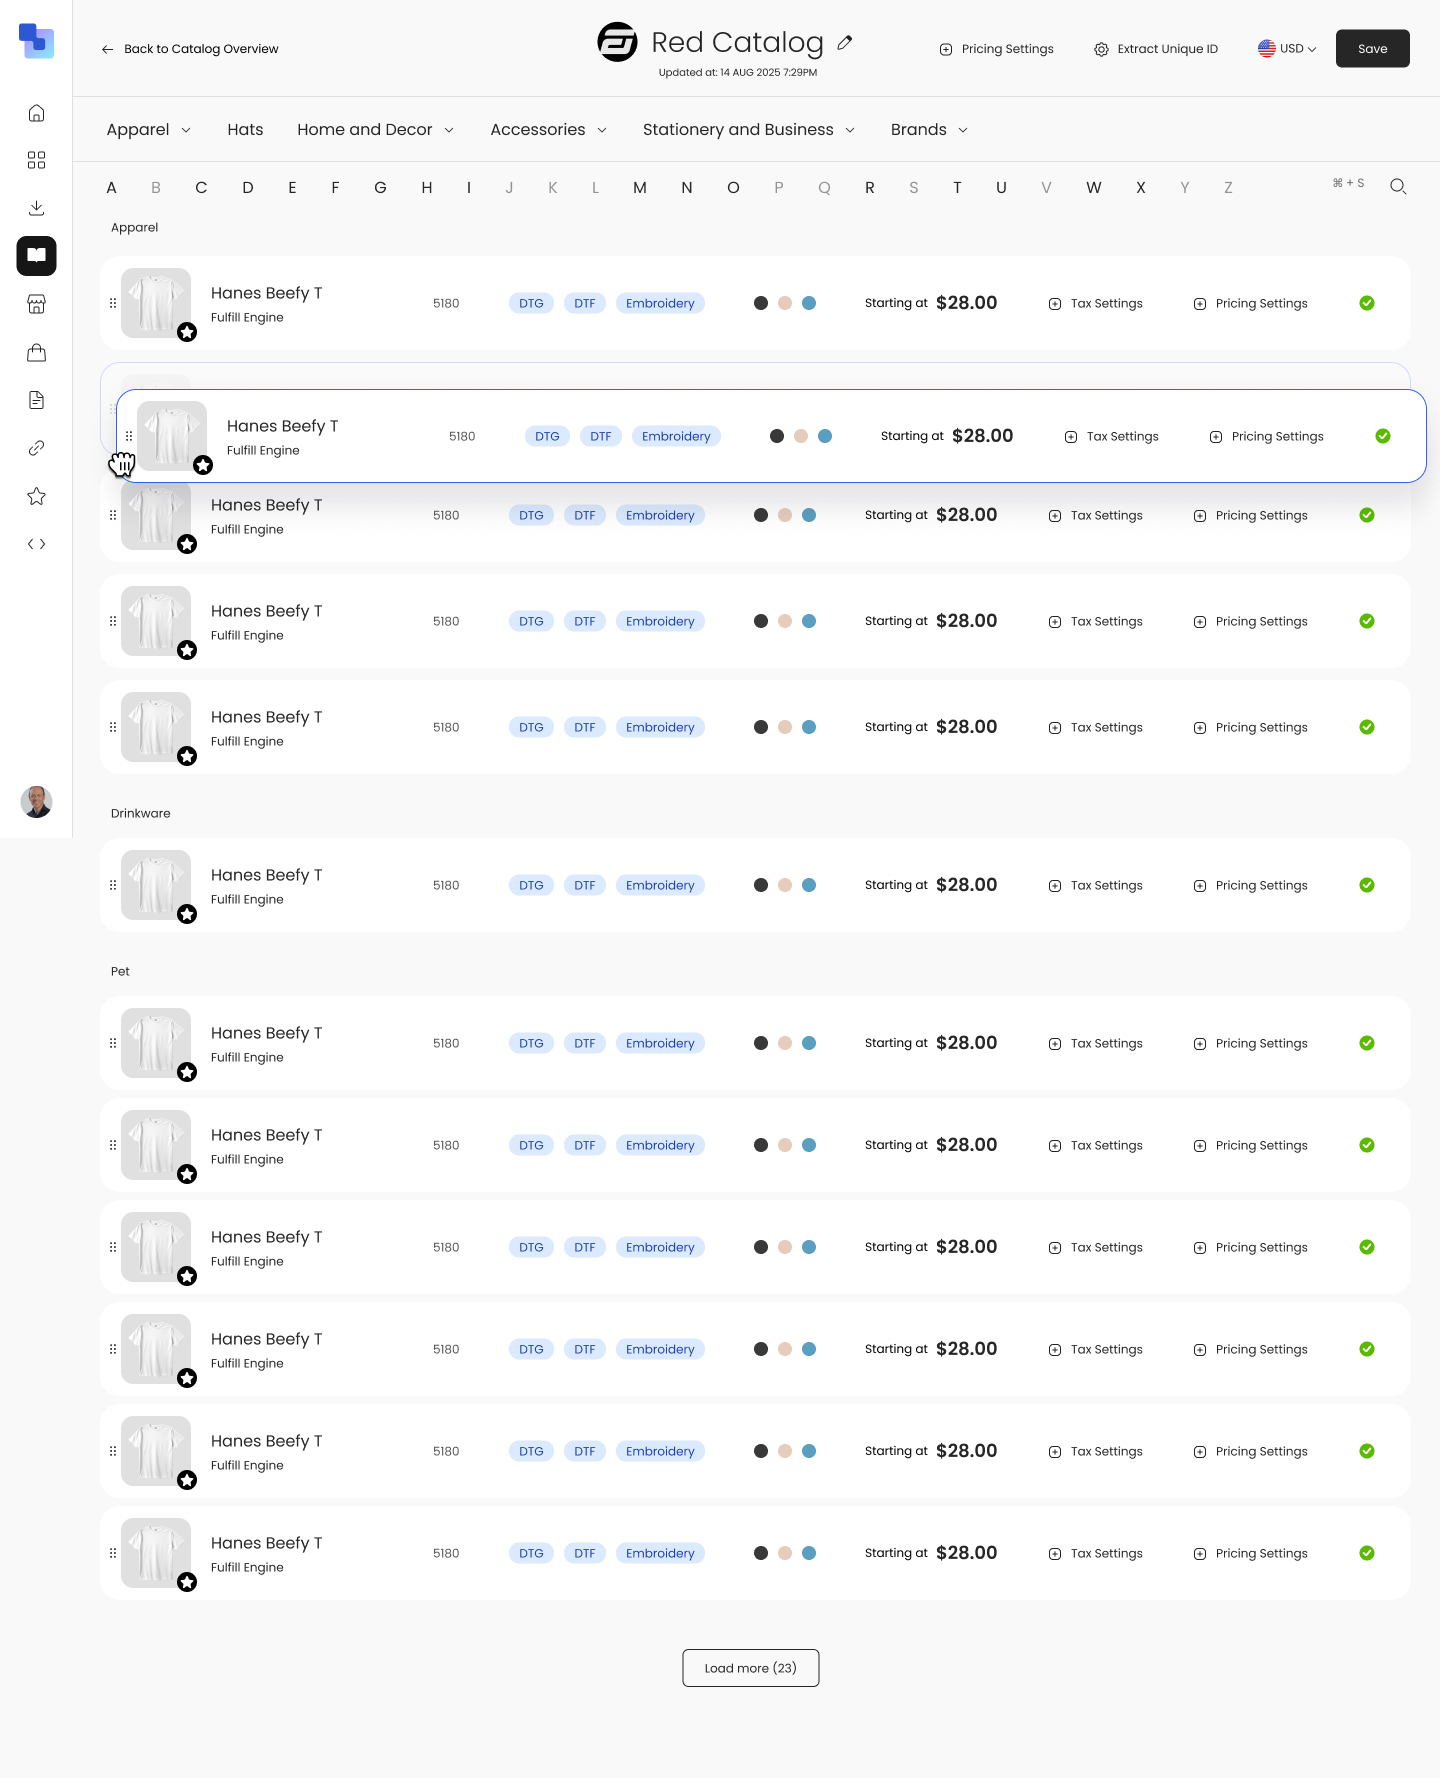
Expand any product to see every variant
Click a product row to expand it and see every color variant with its own progress bar. Each variant tracks independently — assign logos, set pricing, and mark as complete. Blue progress bars show exactly where each variant stands in the setup workflow.
- ✓Every color variant listed with its own status
- ✓Per-variant logo assignment and pricing
- ✓Visual progress bars track setup completion
- ✓Jump to Pricing Settings or Add Logo from any row
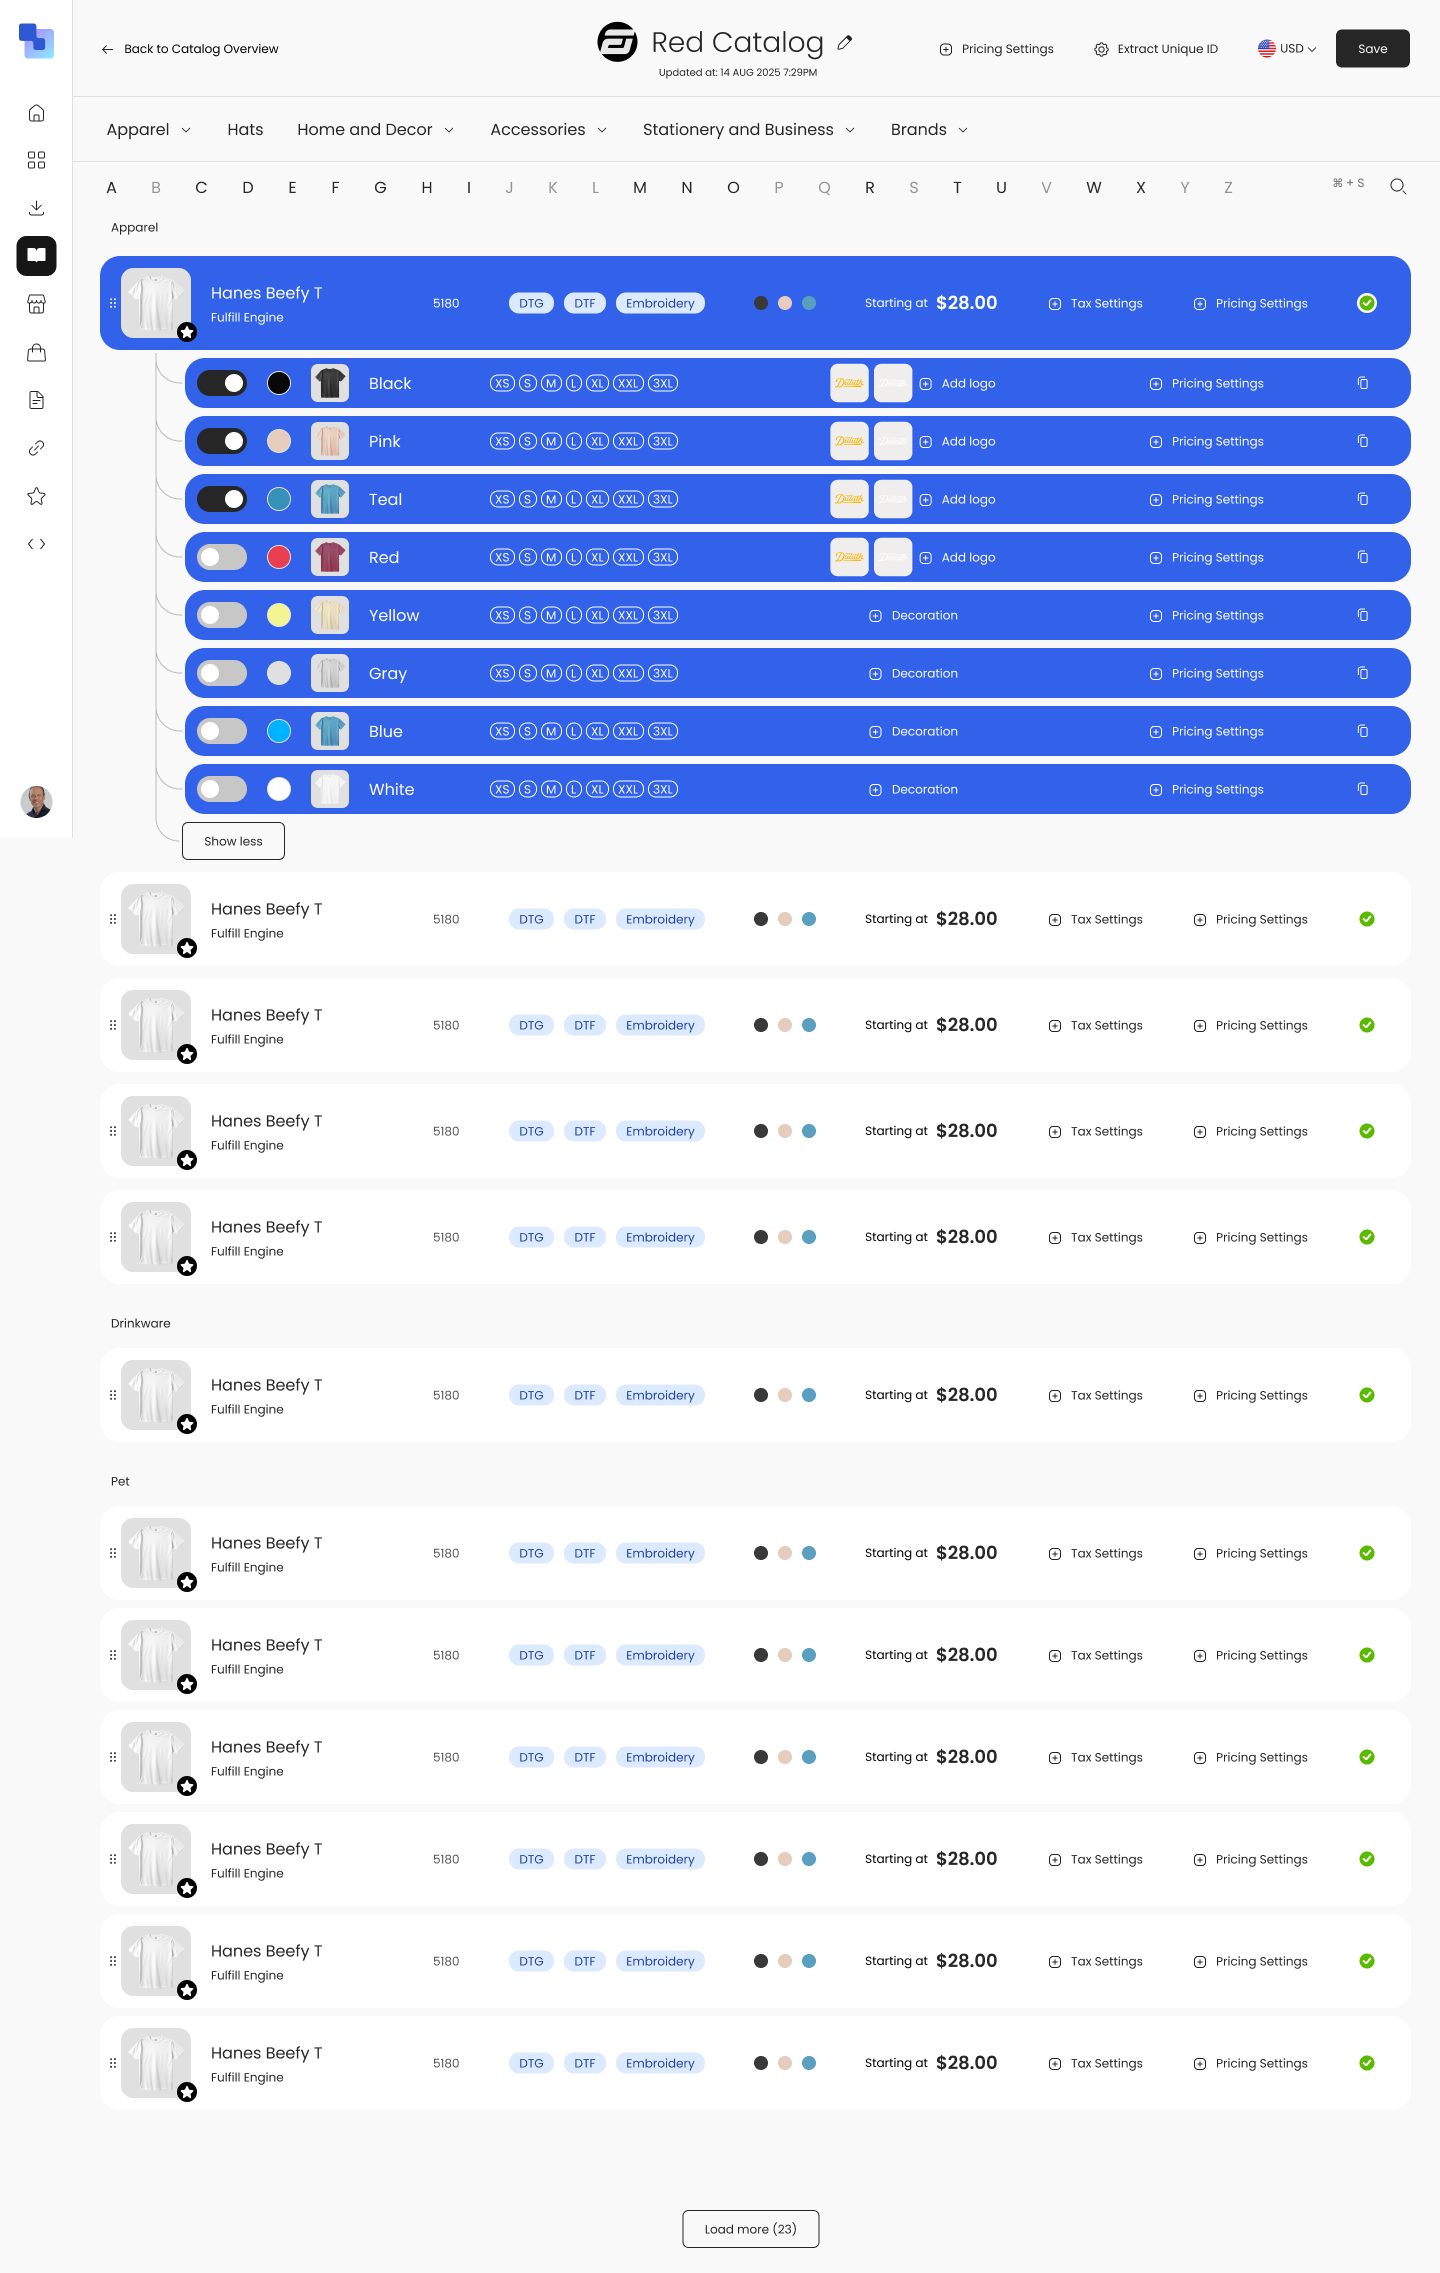
Assign logos per variant, per location
Open the logo management panel for any color variant and assign different logos to each decoration location. Toggle logos on or off per location with a single switch — Full Front, Full Back, Left Chest, Right Chest. Jump straight into the Design Tool to edit the file if needed.
- ✓Different logos per color variant
- ✓Toggle logos on/off per decoration location
- ✓One-click jump to the Design Tool for editing
- ✓Supports multiple logo files per location
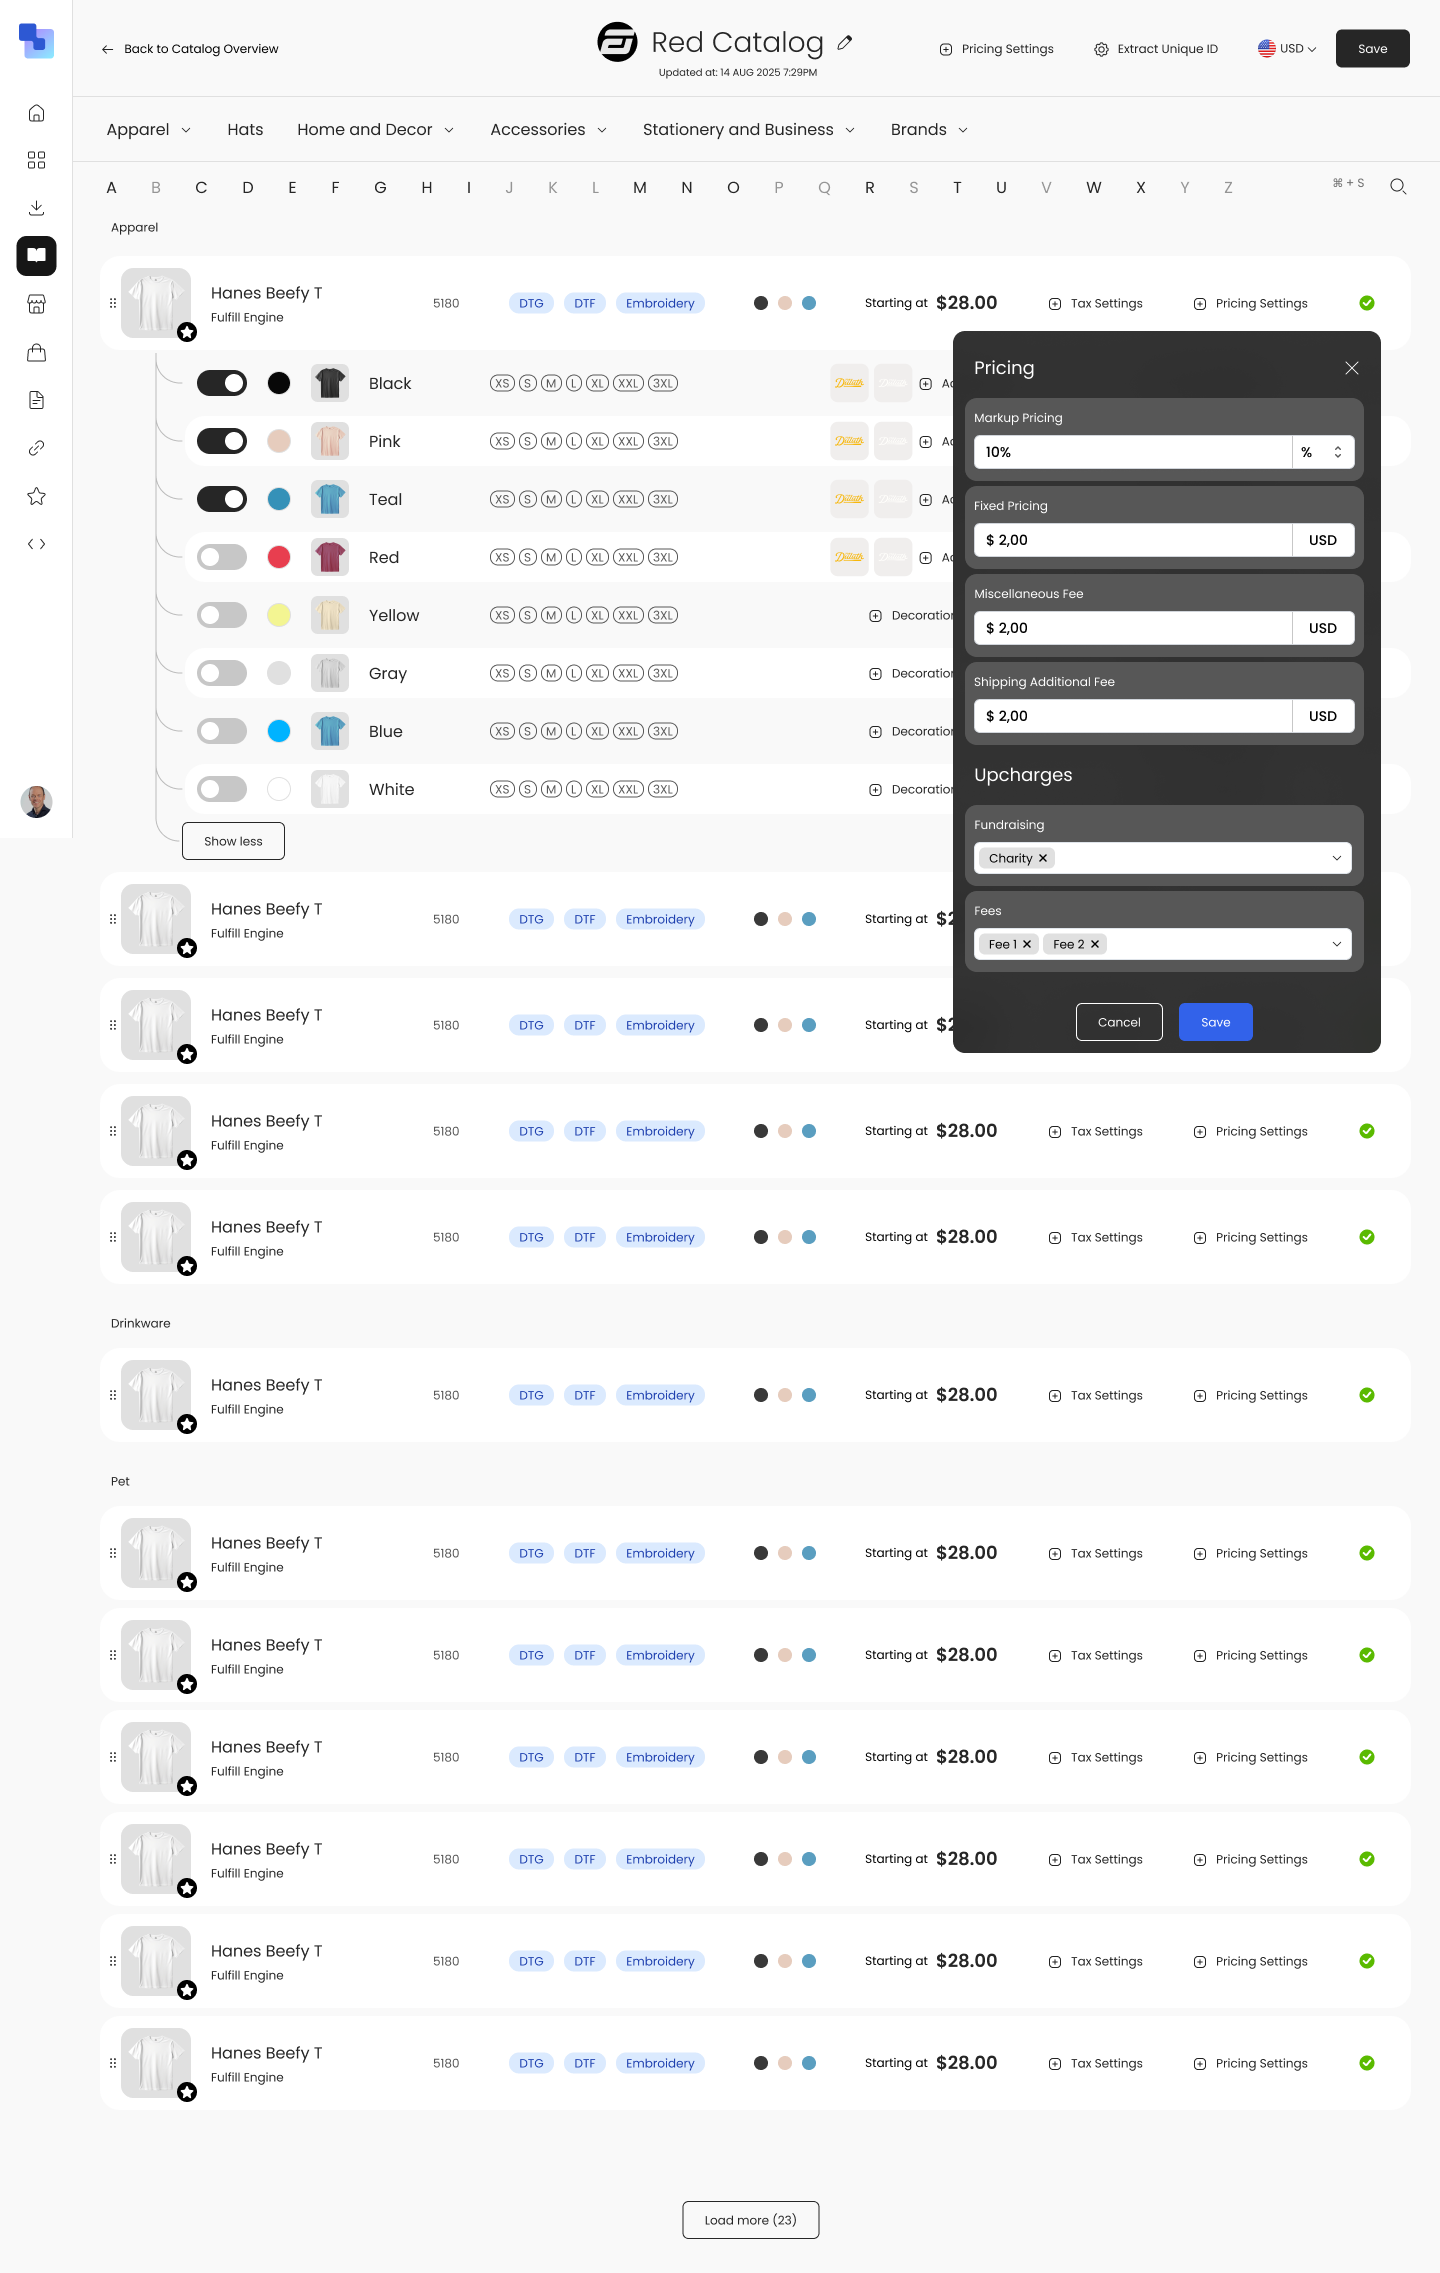
Set pricing inline
Click "Pricing Settings" on any product row to open the pricing panel. Set your markup percentage, add extra charges for shipping, handling, and custom costs, and configure size-based upcharges — all without leaving the table.
- ✓Markup percentage applied to base cost
- ✓Extra charges for shipping, handling, and custom fees
- ✓Size-based upcharges (e.g., 2XL+, 3XL+)
- ✓All configured inline — no separate pricing screen
Everything you need to set up a catalog
Visual decoration setup
Configure decoration locations with a live product preview. See exactly where logos will sit before sending to production.
Embroidery thread profiling
Map logo colors to thread palettes per fulfillment partner. Madeira, Isacord, and other thread brands supported with exact color matching.
Non-apparel templates
Drinkware, tech accessories, and stationery get their own template views with model selectors and specialty decoration methods.
Spreadsheet-style product table
See every product in the catalog at once. Sort by category, navigate with the A–Z index, and expand any row to configure variants.
Per-variant logo assignment
Assign different logos to different color variants. Black products get the white logo, white products get the dark logo — each mapped independently.
Setup progress tracking
Blue progress bars and green checkmarks show which products are complete and which still need attention. Never ship a catalog with missing configurations.
How distributors use the Design Tool
Corporate uniform programs
Set up 50+ products with company logos on the front and employee names on the back. Use the per-variant logo assignment to handle light and dark garments.
Example: A distributor sets up a 60-product corporate catalog with the client's logo embroidered on the left chest and screen printed on the back — different logo files per decoration method.
Multi-brand catalogs
Build a catalog with products from multiple suppliers, each with different decoration capabilities. The table shows fulfillment partner badges so you know which methods are available.
Example: Mix Printful Enterprise DTG products with Fulfill Engine embroidery products in one catalog — each configured with the right decoration methods and pricing.
Promotional product lines
Set up drinkware, tech accessories, and stationery alongside apparel. Use the template view for non-apparel products and the standard view for garments.
Example: A catalog with branded water bottles (sublimation), AirPods cases (sublimation), and t-shirts (DTG) — all configured in one table.
Seasonal catalog refreshes
Duplicate a catalog, update the logo files, adjust pricing, and track progress to completion. The progress bars make it easy to see what still needs work.
Example: Duplicate last year's holiday catalog, swap the 2025 logo for the 2026 version across all products, and adjust markup from 40% to 45%.
From blank catalog to ready-to-sell — five steps
Add products from the marketplace
Drag products into a catalog from the supplier marketplace. They appear as rows in the product setting table, grouped by category.
Design decoration locations
Open the Design Tool for each product. Set up decoration zones (front, back, chest, sleeve), choose the decoration method per zone, set dimensions, and preview the layout on the product.
Upload and assign logos
Upload logo files to the library or browse existing assets. Assign logos to each decoration location for each color variant. The embroidery profiler maps thread colors automatically.
Configure pricing in the table
Back in the Product Setting Table, set markup percentage, extra charges, and size upcharges inline. Pricing applies per product or per variant — your choice.
Track to completion
Use the progress bars and status indicators to track every product. Green checkmarks mean the product is fully configured. Blue bars show partial progress. Ship the catalog when every row is green.
Part of the catalog workflow
The Design Tool and Product Setting Table live inside every catalog. Build a catalog from the marketplace, design and configure every product with the tools on this page, then share or publish it — all in one workflow.
See it in action
Short video walkthroughs of the Design Tool and Product Setting Table.
Using the Design Tool
Set up decoration locations, upload logos, and preview placements.
Product Setting Table
Configure pricing, variants, and track setup progress in one table.
Set up your first catalog today
Design decoration placements, assign logos, set pricing, and track everything to completion — all in one place.